What Is a Stainless Steel Cable Tie Gun and How to Use It Safely?
Introduction
A stainless steel cable tie gun is the key to fast, safe, and professional installation of steel ties. Whether you’re working on heavy-duty cable bundling, electrical cable organization, or harsh environment applications, this tool makes a difference. In this guide, we’ll explain what an SS cable tie gun is, why it’s essential, and how to use it safely step by step. If you’ve ever searched for the best cable tie gun or wondered how to improve your installation process, you’re in the right place.
What Is an SS Cable Tie Gun?
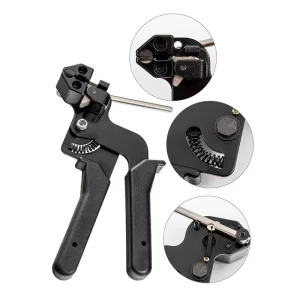
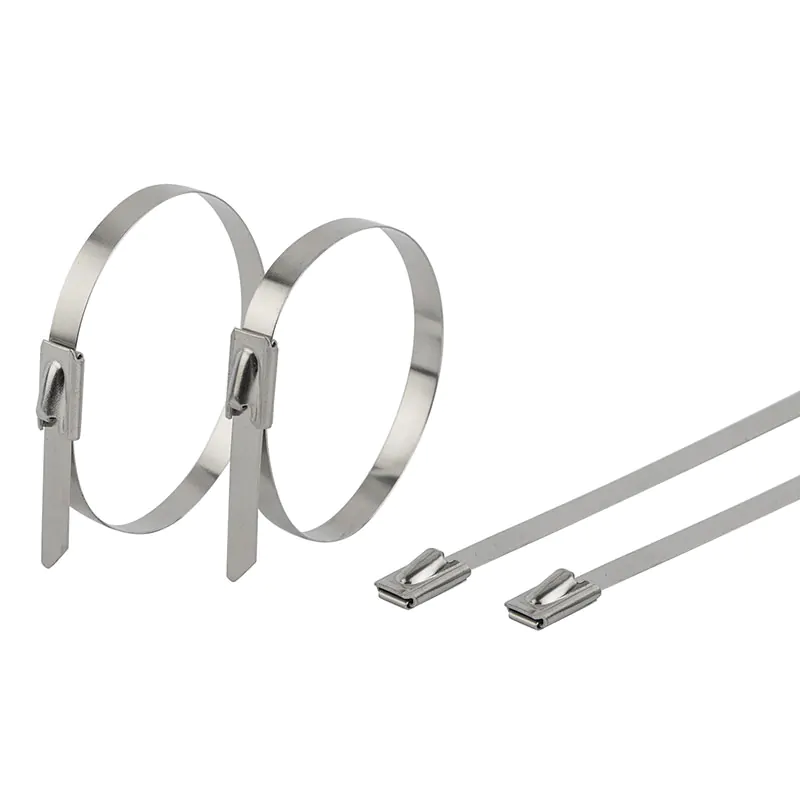
An SS cable tie gun—also known as a stainless steel cable tie gun—is a handheld tool used to tension and cut stainless steel cable ties. These ties are used in industrial settings for secure, corrosion-resistant fastening. The gun ensures proper tensioning and clean cuts, preventing sharp edges and maintaining safety.
There are different types of these tools:
- Trigger-operated SS cable tie tools for precision control
- Lever-operated heavy duty cable tie guns for thicker ties
- Automatic cable tie cutters for volume installations
Most models include features like tension adjustment knobs, flush cutting blades, and durable metal frames. Common names include metal cable tie tool, banding tool, steel strap tensioner, and Stainless steel strap gun.
Why Is a Stainless Steel Cable Tie Gun Important?
3.1 Ensures Repeatable Tension Force
Manual tightening can be inconsistent. An SS cable tie gun provides reliable, repeatable tension with every pull. This improves fastening performance, avoids over-tightening or under-tightening, and maintains cable stability under stress. Tools with cable tie tension adjustment features help users meet exact tensioning specs—critical in aerospace, power, and transport industries.
3.2 Improves Efficiency and Safety in Installation
Using a stainless steel cable tie gun reduces manual fatigue and speeds up work. Many models come with ergonomic grips and single-handed triggers. The cable tie installation tool trims excess tie material automatically, saving time and reducing the risk of sharp edges. With a durable cable fastening solution, operators avoid repetitive stress injuries, especially during mass installation.
3.3 Enables Use of Stainless Steel Ties in Harsh Environments
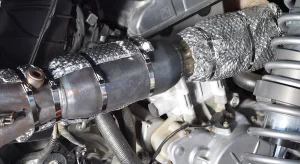
Stainless steel cable ties are corrosion resistant and ideal for marine, outdoor, high-heat, or chemical-heavy settings. An industrial cable tie tool like a heavy duty cable tie gun ensures these robust ties are installed correctly and securely. Whether it’s an offshore rig or a manufacturing plant, a stainless steel zip tie tensioner ensures precision and long-term performance.
How to Use SS Cable Tie Gun Step by Step
Using an SS cable tie gun properly is essential for both safety and performance. Here’s a detailed, mentor-style guide that walks you through the entire process—even if it’s your first time. Let’s break it down into manageable, easy-to-follow steps.
4.1 Prepare Materials
Before you begin, gather everything you’ll need:
- Stainless steel cable ties (appropriate length and width)
- A compatible stainless steel cable tie gun (check tie width capacity)
- Safety gloves (metal edges can be sharp)
- A clean workspace and the bundle you plan to secure
Tip: Make sure your work surface is stable, and you have enough light to clearly see the tie head and tail.
4.2 Select the Right Tie
Choose a tie suitable for the application:
- Light-duty for small bundles (4.6mm wide ties)
- Heavy-duty for industrial use (7.9mm or wider)
- Choose PVC-coated or epoxy-coated ties if corrosion resistance or protection against abrasion is needed
Also, make sure your SS cable tie tool is compatible with the chosen tie width and material.
4.3 Wrap the Stainless Steel Cable Tie Around the Bundle
Take the stainless steel tie and wrap it carefully around the cables, pipes, or object you want to secure. Ensure it lies flat and does not twist.
- Thread the tail of the tie through the locking head or clasp
- Pull the tail through until it’s snug—don’t overtighten yet
- Make sure the head is sitting squarely against the bundle
Pro Tip: For clean installations, align all heads on the same side of the bundle.
4.4 Initial Manual Tightening
Before using the tool, pull the tail gently to eliminate slack. This manual tightening doesn’t need to be forceful—just enough to form the basic loop shape.
- Check that all cables inside the bundle are aligned and not pinched
- Leave a few centimeters of tail to feed into the tool easily
Caution: Never rely on manual force alone; stainless steel is strong and hard to tension uniformly by hand.
4.5 Load the Cable Tie Tail into the Gun
Here’s where the tool comes in. Pick up your SS cable tie gun and follow these steps:
- Open the tool’s loading slot (usually at the front)
- Insert the tail into the slot; push it in until it stops or meets resistance
- Make sure the tool is sitting flush against the locking head
- Keep the gun aligned with the direction of the tie to prevent angle stress
Pro Tip: Don’t bend the tie to fit into the slot. Always feed it straight.
4.6 Tension and Cut the Cable Tie
Now, grip the handle firmly and begin to squeeze.
- Each squeeze adds more tension—use steady pressure
- If your cable tie installation tool has a tension adjustment knob, set it to match the tie’s size and material strength
- Keep squeezing until the tool stops or clicks—this means target tension is reached
- One final squeeze will activate the automatic cable tie cutter, trimming the tail flush to the head
Inspect the cut: It should be clean, with no jagged edges. A good cut protects workers and prevents snags.
4.7 Inspect the Installation
Now perform a final check:
- Gently tug the installed tie to confirm it’s tight
- Check that the head is properly locked and the tail is cut flush
- Run your finger along the cut point (with gloves) to ensure no sharp burrs remain
- If you feel resistance or see misalignment, remove and reapply a new tie
Bonus Tip: Label your bundles after fastening for easier cable management.
Conclusion
Using a stainless steel cable tie gun is essential for safe, efficient, and reliable cable fastening. Whether you’re dealing with electrical installations, industrial automation, or marine equipment, an SS cable tie gun ensures proper tensioning, clean cuts, and long-term durability.
From choosing the right metal cable tie tool to following each step with precision, mastering this process will elevate your installation quality. And if you’re working with larger bundles or harsh environments, a heavy duty cable tie gun or banding tool offers the strength and consistency you need.
For the best results, always select a trusted cable tie tensioning tool built to last. If you’re looking for a stainless steel cable tie gun that combines safety, performance, and value—your project deserves nothing less.